Showing posts with label tutorials. Show all posts

Monday, October 27, 2014

Make shift OMELETTE Recipe


Hey guys! Sharing with you my make-shift recipe on making a quick omelette. This one is perfect for those in a rush or really hungry(like me) and doesn't have the time to prepare much.

What you'll need:
  • An Egg
  • 1/4 cup Fresh Milk
  • 2 tbsps Unsalted Butter
  • 1 small tomato (cut to smaller bits)
  • 2 tbps mayonnaise
  • beans (optional)
 Steps:
  1.  Alright, the procedure is easy-peasy. Start off by heating your frying pan. Set to low heat. 
  2.  In a separate bowl, combine the egg, milk and mayonnaise.Set aside.
  3. Add in the butter and toss the tomato bits. Stir for about a minute. You can stir in optional bits of your desired mixture (ham, spam, chicken, onions or anything you like).
  4. Add in the combined mixture of milk, egg and mayo. Stir until fluffy.
  5. Transfer in a plate. 
  6. For the beans: Cut into 2-3 inches and wash with cold water. Add a tbsp of butter in the same pan used for the omelette and toss the beans over. stir for 2 minutes and serve together with the omelette.
  7.  Serve immediately. Enjoy it with toasted bread or rice. :)

There you have it, - the  No-fail recipe perfect for your lazy self. haha
(And you can even score the ingredients straight from your fridge!)

Try it yourself and tell me how your omelette went. ;)

Til then,


Fayemos
 xoxox

Monday, July 29, 2013

Onion Rings Recipe Made Easy


I was never a fan of onion rings as I can remember until I tasted the ones served in Taters. It was a couple of years ago. Then I tasted series of versions of onion rings like that of Bon Chon's, Wendy's, Burger King, etc.  I then can't resist ordering them every time I see them on the menu. 

To satisfy my cravings and to practice my cooking skills, I tried making my own. Today I made my own version and it was a success! Thanks to manang for helping me out with the frying of my creation though. I never thought I could make my own and save really lots of money instead of buying from fast food chains or the like. Yey me! haha

The ingredients are basically found in the supermarket and are really affordable. 
Here's the quick and simple guide.

What you will need:
  • 1 1/4 cup All Purpose Flour
  • 1 Egg
  • 1 tsp. Baking Powder
  • 1 tsp. Salt
  • 1 cup Evaporated Milk
  • 1-2 cups Bread Crumbs
  • cooking oil (for deep frying)


Steps:

1. The first step is to slice the onions into rings. The size of the rings depend on you. You can cut them to thin or thick slices of your choice. Set aside.

2. Then mix the flour with the baking powder. Add the salt as well.


3. Add the beaten egg until lumpy and then stir in the evaporated milk.


4. Once the batter looks smooth, add the cayenne pepper and the hot sauce. Now in this case, you may add more or skip this step if you don't like your rings to have a little spicy taste.

5. Now with the finished batter, dip the onion rings individually, coating everything. Then put them to a bowl of bread crumbs. Coat them with the bread crumbs fully.

6. Finally, Deep fry the rings one by one on low heat. Wait for it to turn golden brown before switching sides. Then place them into paper towels to remove excess oil. Serve and eat immediately. ;)


Here's a closer look to the finished onion rings. :) Success! heehee


So there you have it! Well yeah, practice makes perfect. haha.


Til here,
Fayemos

Wednesday, July 17, 2013

Oreo+Cream Cheese Cupcake

Welcome to another foodie tutorial, bloggies! This time, I made a quick and easy recipe guide on how to make an Oreo + Cream Cheese Cupcake. This dessert is good for those who love to eat cold sweets and enjoy oreos.

Here are the very basic ingredients you will need:

  • Cream Cheese            - 5oz
  • Biscuits                       - 3-5 pcs.
  • Oreo Cookies             - 6-7 pcs.
  • Butter                          - 1/2 bar
  • All Purpose Cream      - 1/4 cup
  • Candy Sprinkles          - 1 pack (small)
  • Vanilla                         - 1/2 tsp.
  • Confectioner's Sugar    - 2 1/2 cup

Procedures (Made Easy):
  1. Prepare your ingredients. Make sure you start with the complete set of ingredients so you won't end up rushing to get some other stuff or even buy out.

Confectioner's Sugar


Oreo Cookies

Graham Biscuits

Cream Cheese

Butter

Vanilla

Cupcake Liners

Candy Sprinkles

Cupcake Cases

2. Start by whipping the cream. You may actually use a whipping cream instead of the all purpose. Then transfer to another bowl or cup. Then using the same bowl where you've whipped the cream, add the biscuits. Crush the biscuits and melt the butter so it will be easier to combine them.


This is the cream. I added sugar to it by the way. It is optional though. I just added sugar to make it taste sweeter.
 3.  On a separate bowl, combine the cream cheese and the confectioner's sugar. Then add the vanilla extract. Mix them until well blended.


4. Prepare the cases. Place the cupcake liners in the cupcake cases. You may double the liners to avoid sticking of the residues to the case or just simply to avoid the buttery texture if you opt for the single liners.


5. From there, you put in the biscuit mixture using a spoon or spatula and push it inward to flatten it. This will serve as the base of the cupcake. Do it repeatedly on all cases and let cool for around 30 minutes or until firm.


6. Back to the Cream Cheese mixture, make sure to mix it very well until frothy. Then add the crushed oreo cookies. Crush only 3-4 pieces of cookies and leave the remaining for the toppings.


7. So this is now the mixture. With an ice cream scooper, or in my case, a chinese soup spoon, put the mixture into the cases topping until the top part. You may or may not chill this for about an hour or 2 before proceeding to the next step.


8. With the remaining oreo cookies, scrape out the filling and do whatever you like with it. I gave mine to my pets. haha. Then crush the cookies to very fine particles. In crushing, you may put the cookies inside a zip-lock bag then use a rolling pin to crush them finely.

9. Then top it over the mixture in the cases, covering all space.


10. This step and the rest are optional. So in my case, I cut out a heart-shape using an oslo paper and placed it on top of the cupcake mixture. Then I crushed white biscuits finely and sprinkled them at the cut-out area. I then removed the paper to unleash the shape :)


11. Then finally, I topped them with the candy sprinkles. Basically, you can decorate the cupcake on whatever design your mood tells you.

12. Chill overnight and serve. :)

Tadaahhh! Presenting my first ever Oreo+Cream Cheese Cupcakes. <3 p="">


So that's it for another foodie tutorial! Will bake chicken ala king for my next recipe though. Thanks for viewing and hope it will guide you if you want to try this dish too. Have a nice day! :)

Friday, July 5, 2013

From boring polo shirt to cutesy chambray top

Hey there! It's been a while since I had the mood to update my blog about some easy steps to make something. This time, I decided to play with the scissors, needle, thread, buttons and boring polo shirt. Basically, this is a sewing project. :)

It all started when I got a big dose of insomnia and my hands came looking for scissors and a fabric to cut. But then, all fabrics available were so new and I'm not in the mood to create a really big project say for example, making a blouse. AND--- the electric sewing machine is sick and I had no idea how to fix it or use the manual instead. So yeah, hand-stitch it is! haha


Okay, since everything seemed so screwed up, I raided my closet for any clothing malfunction and from there came the boring white polo shirt that can't even fit my arms (adding to my insecurities). My mood actually decided what to do with it, and somehow, the suggested chambray was a good catch. :)


Here are my easy steps on how to re-create a boring polo shirt to a chambray top:


What you will need:


  • Old/boring Polo Shirt
  • scissors
  • colorful threads
  • needles
  • thimble
  • buttons
  • sewing machine (optional)
  • stitching skills


First Step:
   Look for a boring polo shirt or any with a defect (e.g. super tight sleeves) then consider it as the base of the new chambray top. Then prepare the necessary materials like the scissors, needles, threads and all.

Second Step:
      Next, you cut off the sleeves leaving about an inch or a half in the connecting hems. Below you can see that I cut the sleeves on a free-form manner since the cut whether straight or not, doesn't matter because it will be hidden in the latter part. 


 Third Step:

    Then you fold the remaining portion inwards so you will achieve the clean sleeveless look after the next stitches. In here, you can opt to use some pins to secure the fabric in place when you sew them later. 


 Fourth Step:
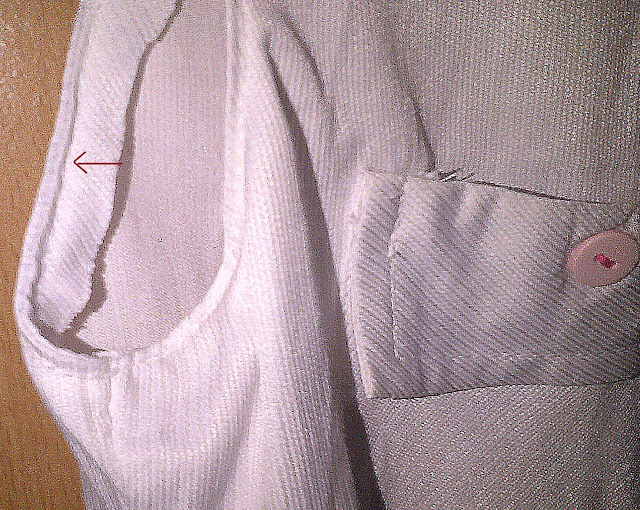
    From there you start sewing. You can use any sewing tool you have whether you use an electric sewing machine or the manual one (the one on which you use your foot to let it work)-or like in my case, hand-stitch! Just make sure to as much as possible, make it clean and neat. Also, keep the stitches running to avoid loose threads which might break the remaining cloth. Below you can see the edited photo with an arrow indicating the motion of the stitch-inward. I also manipulated the photo to somehow sharpen it so it'll be clearer to see the stitch. 


These are thimbles by the way. One is normally used on the pointing finger to keep it safe from the impact of the needle especially when you're into hand-stitching.


Fifth Step:
    Change the buttons of the top depending on your desired colors or styles. This step is optional though. In my case, I find the buttons plain so I selected a pop of pastel colors to keep the look sweet and simple.


 Sixth Step: 
  After changing the buttons, You can now knot the bottom part of the top to complete the total look of the desired chambray top. :)


Tadahh!! This is the finished product. Not bad right? :)


So there it is! Till the next tutorial sesh! 


-Fayemos


***Photos (except for the thimble pic) are taken by my blackberry phone only.